This page provides “How To” help concerning the various features of the Open Decision Tool. Additional Decision Management “methods guidance” is available through the Guidance link associated with each section.
The Landing Page
To sign-up at the site, you will enter an email address, password and user name. You will receive an email with a link to verify your account.
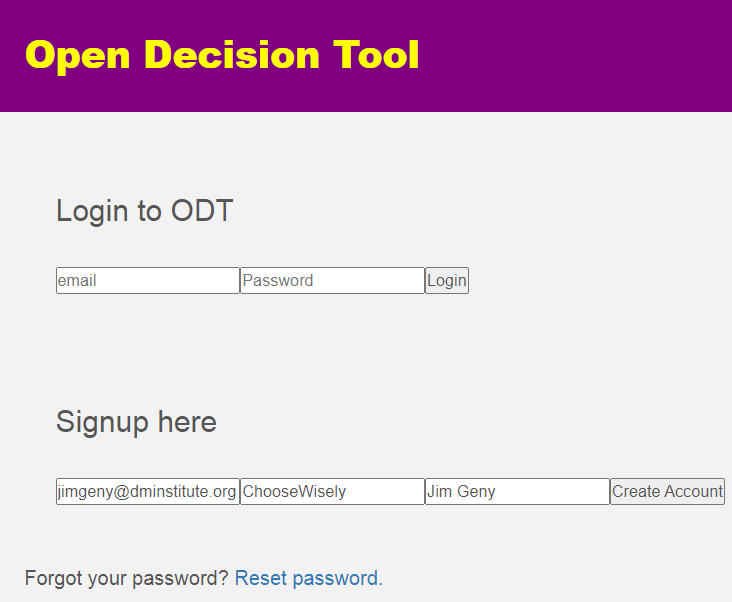
Enter your email and password to sign in to your ODT account. If you have not verified your account, you will be reminded to check your email.
If you need to reset your password, you can have a reset link sent to your email address.
Note: Throughout this Help guide, we will use a sample user, Jim Geny, to create a simple, but realistic example for you to follow.
Getting started in Open Decision Tool
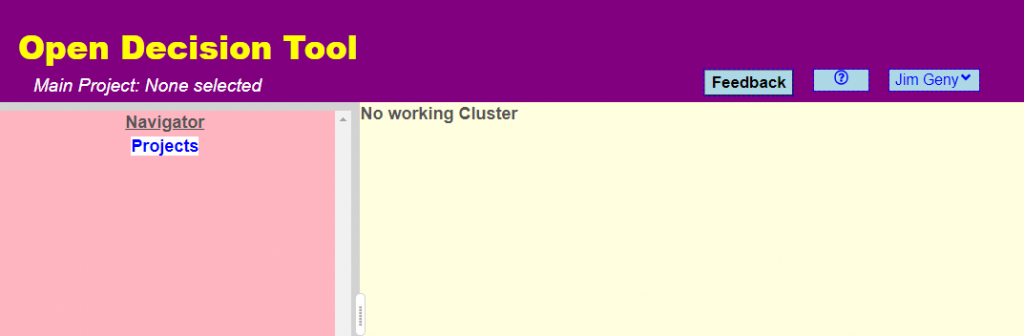
Once logged in, you will see an “empty” view of the Open Decision Tool with no projects or other data. Your first task will be to create yourself a project working space to capture your thinking.
Import Multi-Decision Pattern as a Project
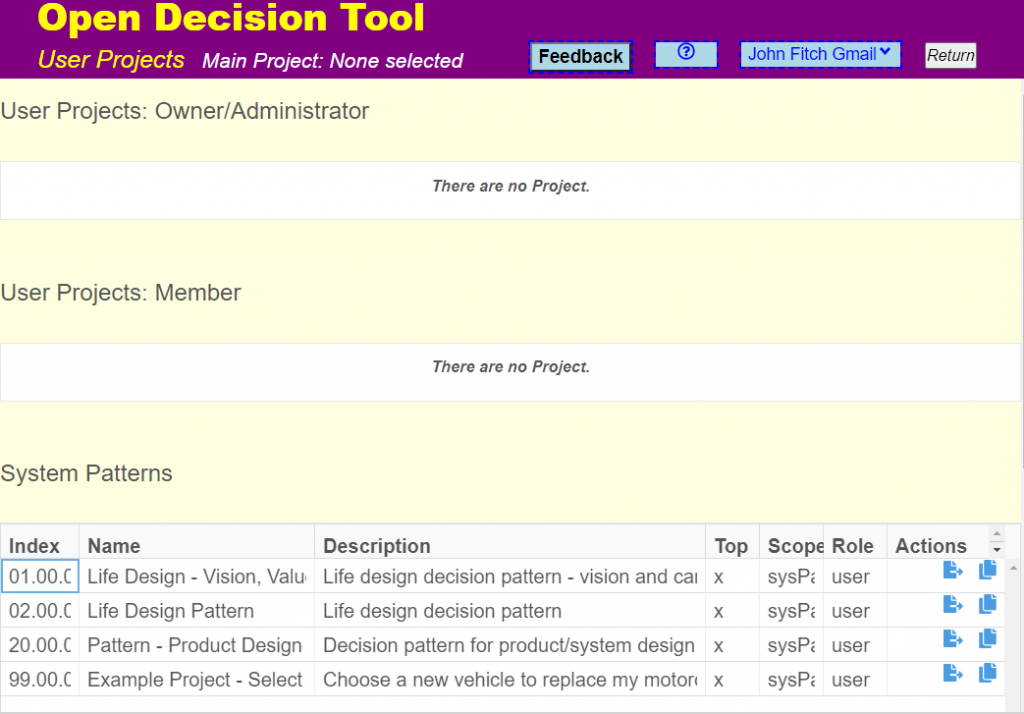
This simplest and most efficient way to start using the ODT is to leverage an existing project pattern to populate your first project.
The DMI has created a rich set of decision (and in the future need/requirement) patterns such that you should seldom have to create a project or an individual decision from scratch. We have organized these projects in data sets with like types of information arranged in “clusters” that appear as folders under the project. During the demo phase of the Open Decision Tool, we will provide partial decision patterns for Life Design, Product Design and Enterprise Strategy. You will often want to import such a project as you face a new season of life or phase in the development of a product or a business.
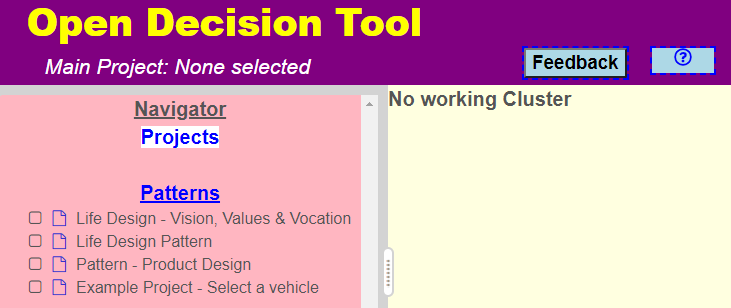
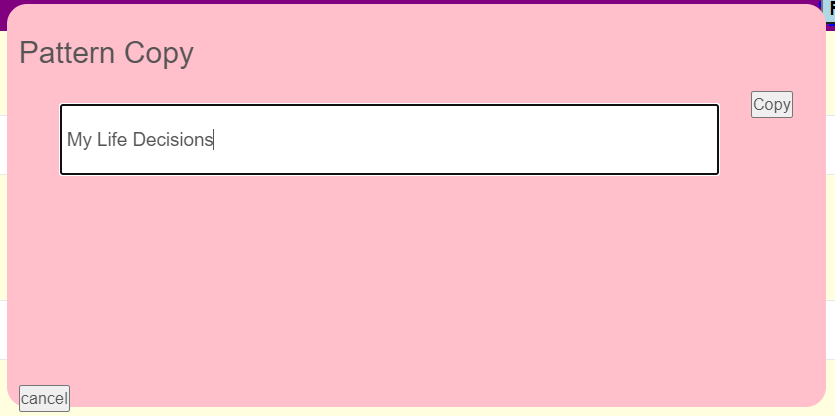
If you see one or more patterns available in the Navigator panel, you may create a personal project instance of that pattern by clicking on the Projects link. Click the Copy icon (far right) on the pattern that you desire to copy into a new project, e.g. Life Design – Vision, Values & Vocation.
Give your project a name to complete the copy operation.
Edit the resulting project description as desired.

Your organization may also have project patterns (.cnod files) that have been tailored to your needs.
To seed a new project from a .cnod file, navigate to your User Projects page by clicking on the Projects heading in the Navigator panel. Use the ‘Import Project’ feature to select the file and to name the new project. Click the Import button to add the Project to the Navigator.
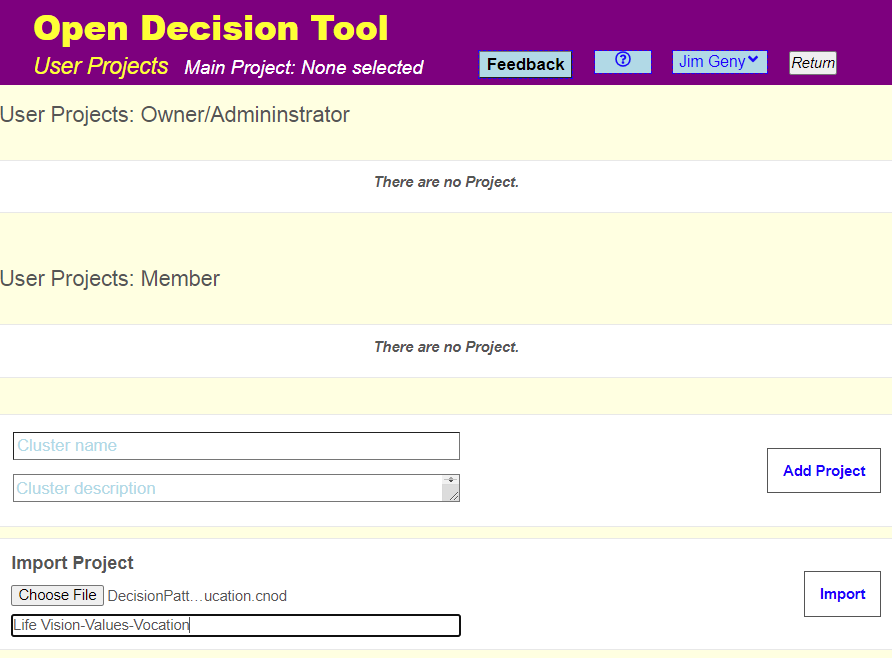
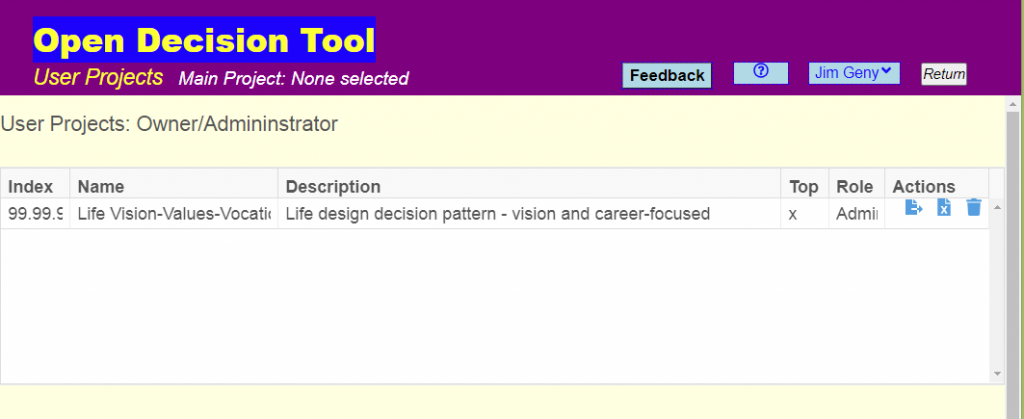
The newly imported project will appear on the User Projects page.
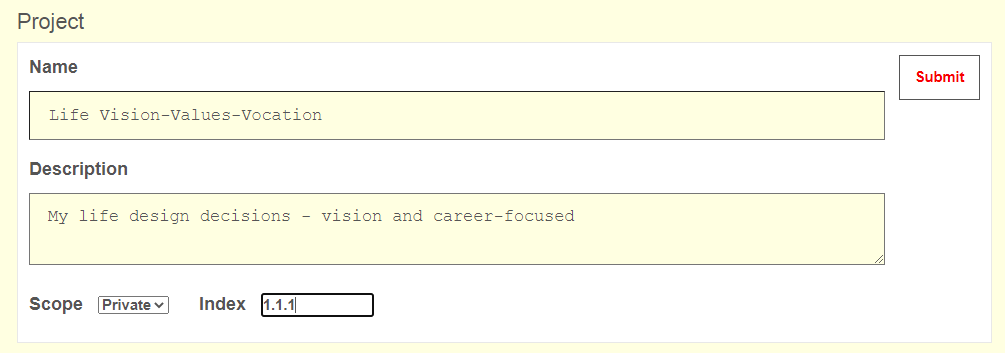
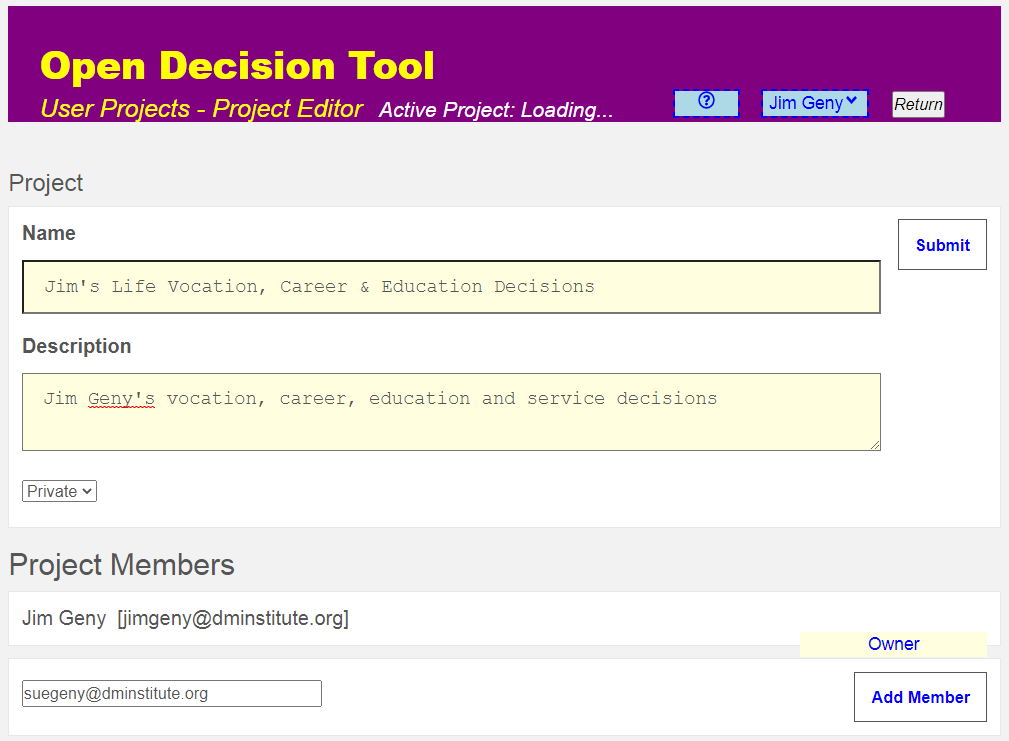
Project Editor
Clicking on the project name will open the Project Editor and enable you to modify the project’s Index (n.n.n number used for sorting the project list), Name or Description or to add/delete project members or project data sets (clusters of Stakeholder Needs, Requirements, Decisions or Functions). Feel free to personalize the Project Name and Description that was inherited from the pattern.
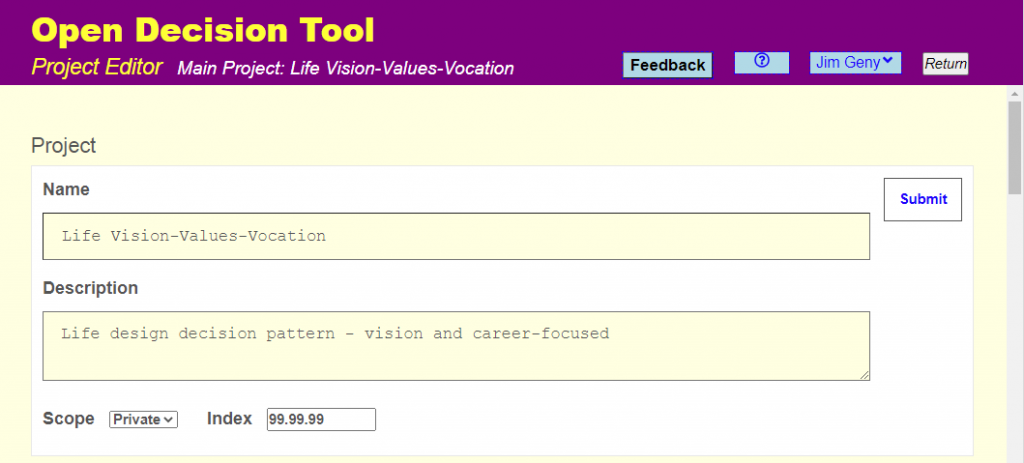
After making changes to these fields, click Submit to save your edits. Note: If you have unsaved changes, the text in the Submit button will be highlighted in red.
Unless you wish to share your project with everyone (literally everyone, so use this option only if building an example that you want to make visible to all ODT subscribers) leave the ‘Private’ toggle as-is.
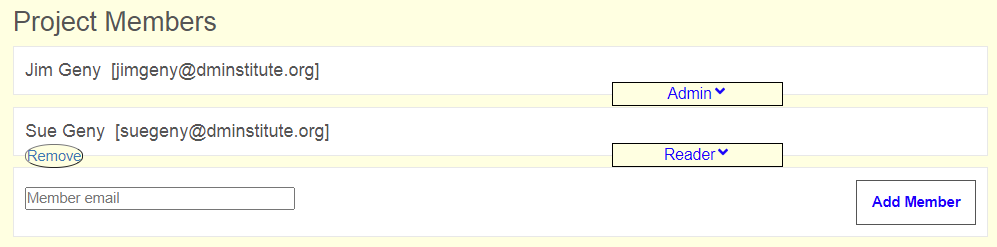
Manage Project Members
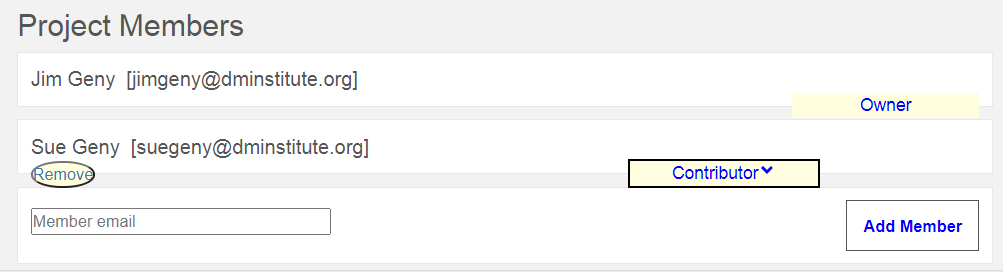
You may give access to your project to other ODT users by adding them to the Project Members panel within the Project Editor.

Jim decides to add his wife, Sue, so that she can see his latest thinking.
From the Project Editor, ‘Return” will take you back to the User Projects page. Always use the Return option within the ODT (rather than your browser’s “Back” button) when navigating back to the previous page.
The User Projects page also displays projects that have been shared with your by another project Owner or ODT Administrator and the level of access rights given to you for those projects.
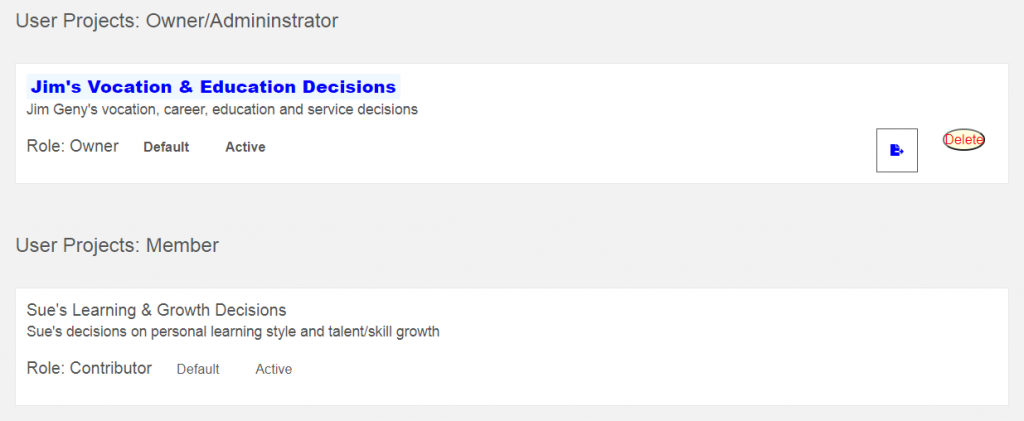
Create New Project
To create a new project from scratch from the User Projects page, enter a Project Name and Project Description and click on the ‘Add Project’ button.

Main Page
Use the Return button to view the ODT’s Main page. The Main page is comprised of three sections.
Use the Navigator panel to select a project or pattern and to display its contents. The Page Header will show the active section of the tool (e.g. User Projects, Decision List, etc.), the active project and the signed-in user.
The Help (?) menu gives you the option to visit the About page that describes the features added to recent versions of the tool. This menu is also where you access the DMI’s Help Home page.
The ‘User’ drop-down displays your user name and enables you to either navigate to your ‘Profile’ settings or to ‘Logout’.
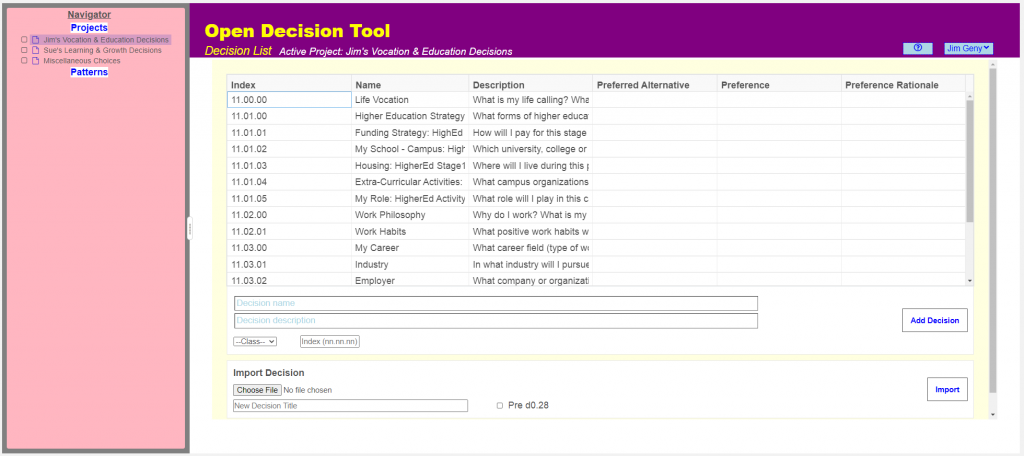
The Decision List is where you will maintain the decision model for your life or business.
Decision List
There are three ways to populate your Decision List:
- Import an entire new project that includes multiple decisions from a pattern or a previously populated decision cluster (preferred)
- Import a single decision from a pattern or a previously populated decision
- Add a single decision from scratch
Our sample user, Jim Geny, has imported a rich decision pattern to jump-start his efforts, so we will illustrate the second and third methods without adding any decisions to his project.
Import Decision
To import a decision, click on the “Choose File” button. A file browser will open where you can select a file with a .dcn extension (having been created by the export file function). Once selected, upon return to this page, click the “Import” button.
Perhaps, Jim Geny has access to a friend’s Career decision that he would like to import as an example. To do so, locate the decision archive (.dcn) file on a hard drive. Give the decision a new name and click “Import”.

To use this function to seed your Decision List with individual decisions from a pattern, first export the pattern decision as a .dcn file.
Copy Decision from Pattern
FUTURE FEATURE. As a DMI member, you will see multiple decision pattern “clusters” under the Patterns section of the Navigator panel. Open the desired pattern and use the Copy Decision feature to copy-paste the selected decision between the pattern and one of your projects.
You may also use the Copy Decision to copy a decision from one pattern to another, from one project to another or from a project to a pattern cluster.
Add New Decision
You may add a new decision from within the Decision List b entering its Name, Description, Class and Index Number and clicking “Add Decision”.

Move Decision
FUTURE FEATURE. Use the Cut and Paste Decision features to move decisions between projects and patterns.
Decision List Layout
However populated, the Decision List displays a summary table of the decisions within the project that is currently selected in the Navigator panel. The Decision Name and Description will be shown for all decisions. If a preferred alternative has been identified for the decision, that alternative’s Name, Preference level (Current Favorite, Committed or Legacy) and the Preference Rationale will be shown.
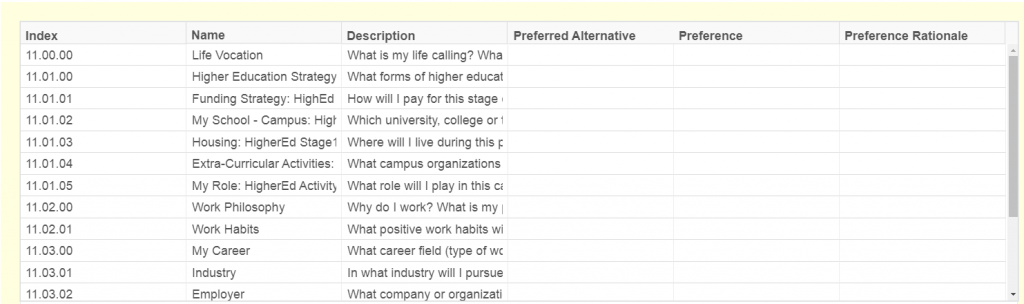
You may hover over any field to see its full contents (if truncated in the display).
Note that decisions may be sorted by a Decision Number to represent a hierarchical structure. You are not required to make decisions in any sequence, but the numbering scheme can help you create a top-down decomposition (plan of attack) of the decisions that you face in your current situation.
Jim Geny wants to start with the My Career decision.
Decision Editor
Click the decision Name “cell” in the table to open the Decision edit panel for any decision in the Decision List. Modify the decision name and description as desired.
Set the decision Class (Single answer, Multi-part answer or Multiple answer) based on the number and type of alternatives that this decision will choose. Most “How?” decisions expect you to commit to a single answer, though some are answered by a multi-part method that is best described as a system of interacting parts. Some decisions call for a choice between N out of M possible alternatives such that multiple answers in a list best represent the chosen solution. Note: If you imported a decision from one of DMI’s patterns, the decision Class will be set for you.
Enter a decision Number to represent this decision’s place in a hierarchy. Click “Submit” to apply your changes.
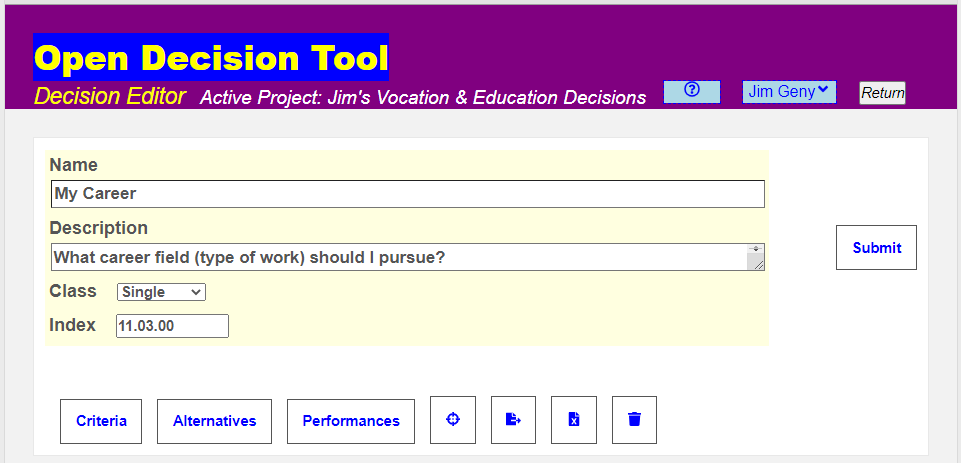
Criteria List & Editor
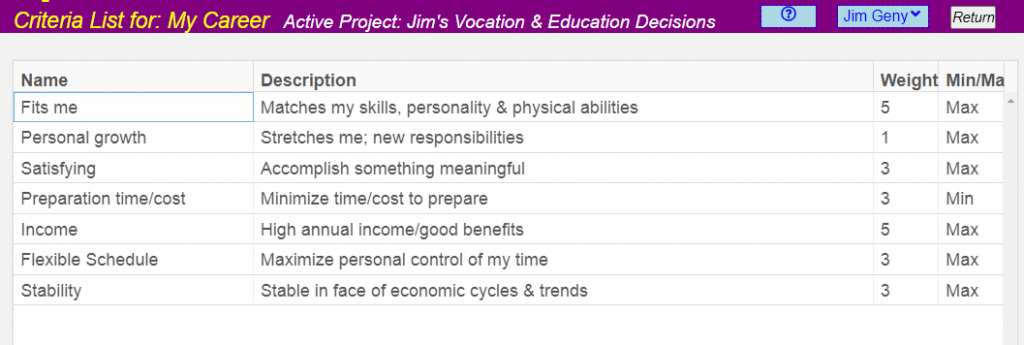
Within the Decision Edit panel, click the Criteria option to view the Criteria List for the current decision. If the decision has been imported from a pattern, there may be 7-15 criteria already identified to jump-start your process of defining “success” for this decision. Freely tailor these criteria (add, merge, split or delete) to match your decision priorities.
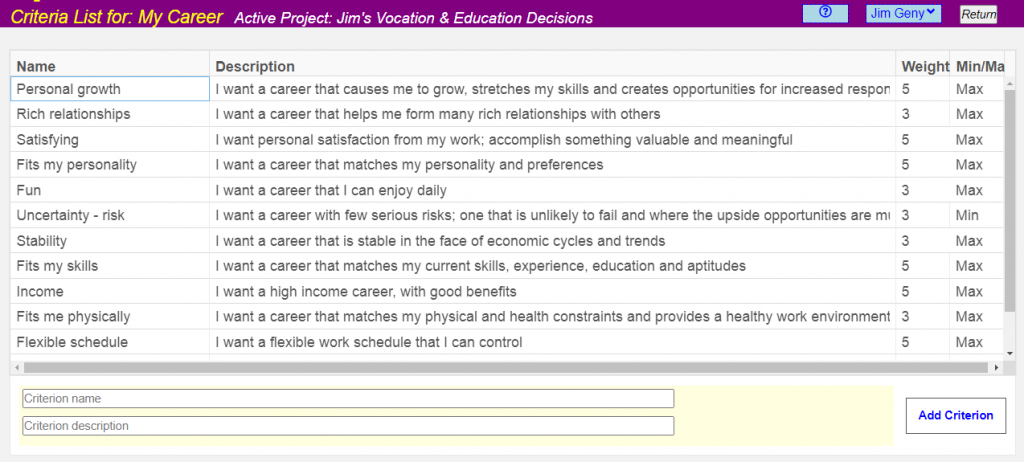
Using the Add Criterion option at the bottom of the page, enter a criterion name and description and click Add Criterion to create a new criterion.
Modify any criterion in the list by clicking on its Name cell in the table and editing any fields desired in the popup edit panel. Use the Submit option to apply your changes. You may also delete a criterion from within the editor.
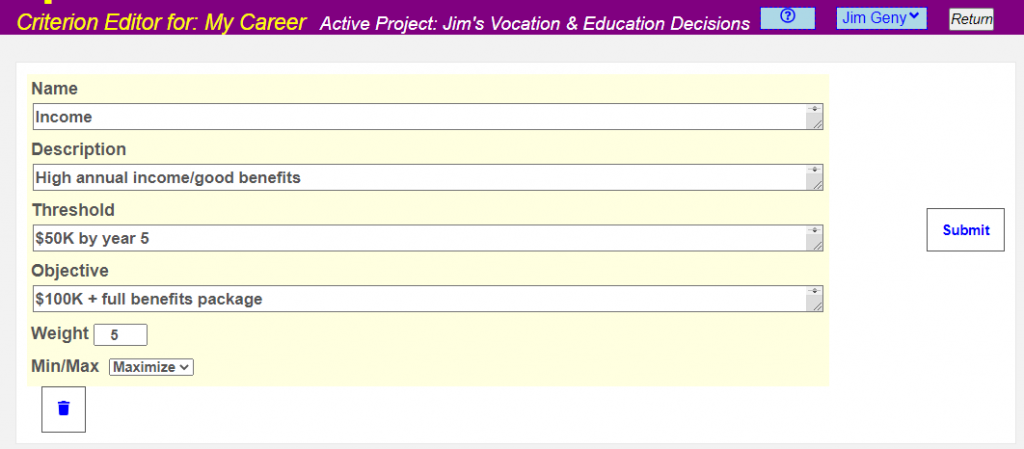
Here is Jim Geny’s final set of criteria for the My Career decision.
Alternatives List & Editor
Within the Decision Edit panel, click the Alternatives option to view the Alternatives List for the current decision. Using the Add Alternative option at the bottom of the page, enter an alternative name and description and click Add Alternative to create a new alternative.
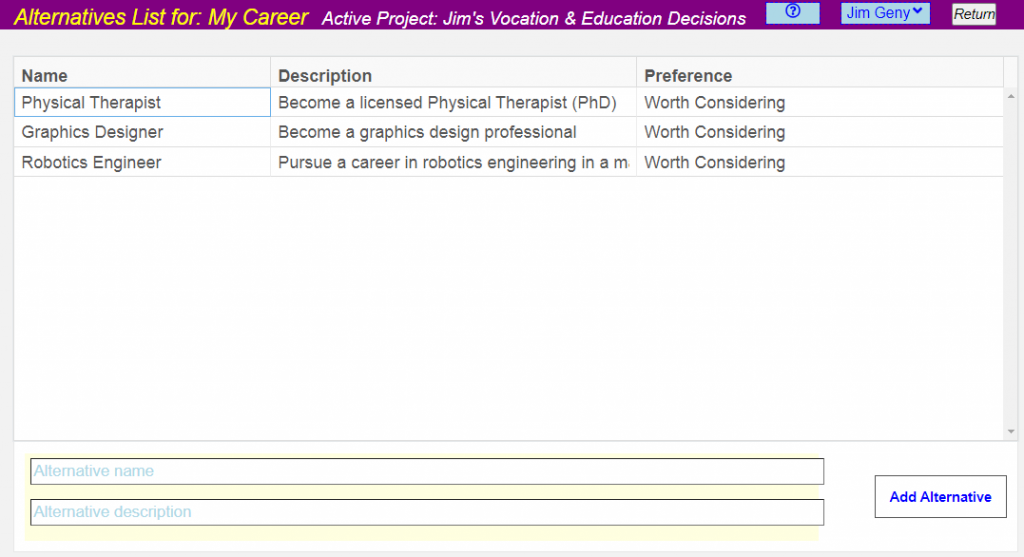
Modify any alternative in the list by clicking on its Name cell in the table and editing any fields desired in the popup edit panel. Use the Submit option to apply your changes.
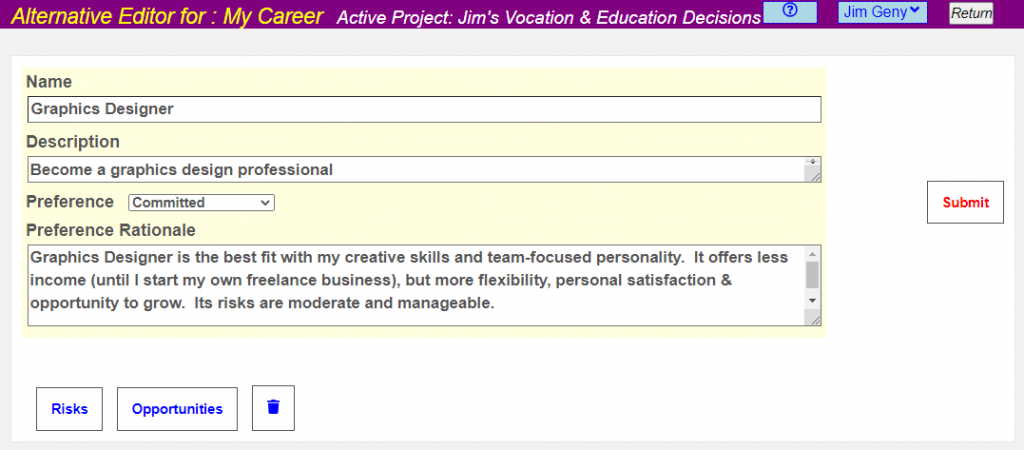
Note: This example shows the post-decision state of the chosen (aka “Committed”) alternative along with its Preference Rationale. These fields would typically not be populated until the full evaluation (Screen/Score & Assess Risks/Opportunities) process has been completed.
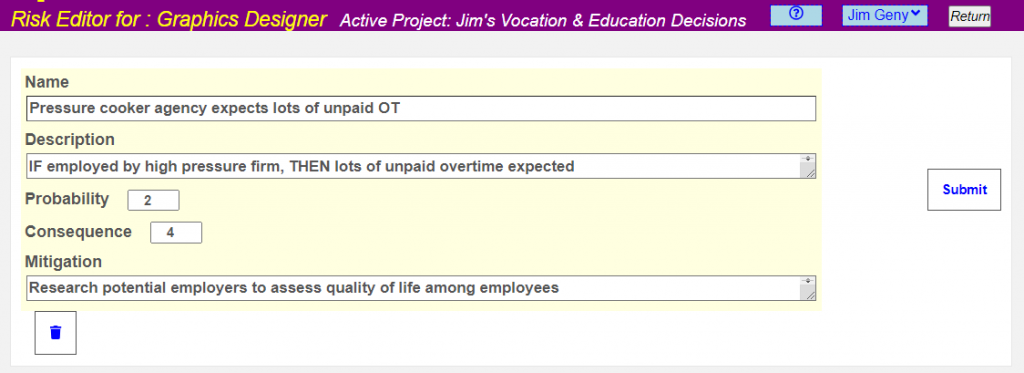
Risk Table & Editor
For each alternative, you may identify potential problems and failure modes, i.e. risks that would make you hesitant to choose the alternative.
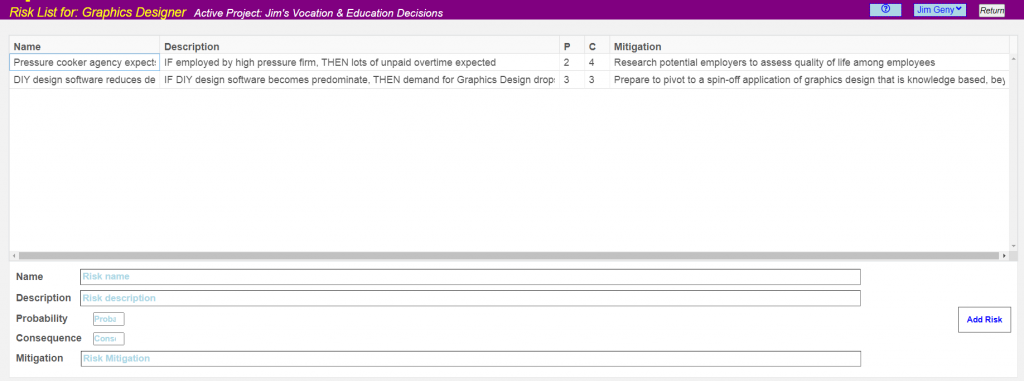
Name each risk as a potential problem, describe it in IF-THEN terms and assign Likelihood and Impact to define the degree of threat the risk posed to the success of this decision.
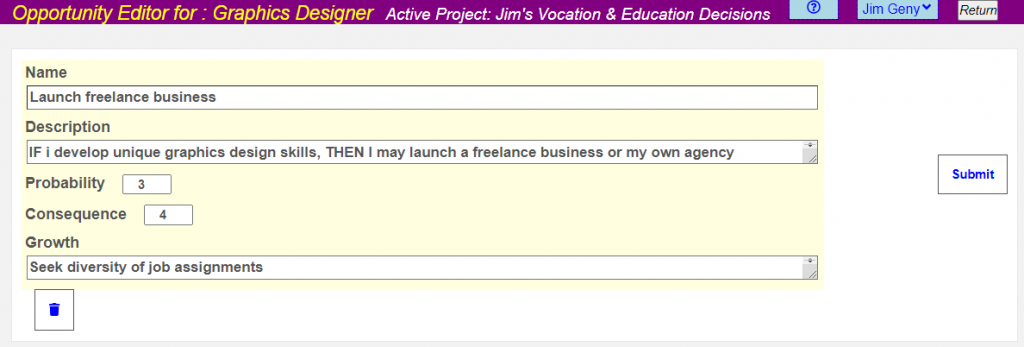
Opportunity Table & Editor
For each alternative, you may identify potential opportunities, i.e. better an expected windfalls that would make the alternative significantly more attractive if they occurred.
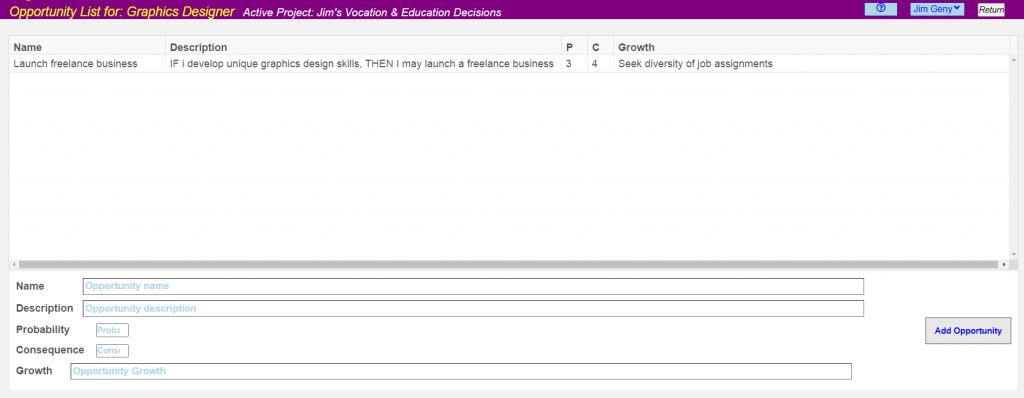
Name each opportunity as a potential windfall, describe it in IF-THEN terms and assign Likelihood and Impact to define the degree of benefit the opportunity adds to the success of this decision.
Performance List
Within the Decision Edit panel, click the Performances option to view the Performance List page for the current decision. Within each criterion panel, enter a Scoring Rationale and Score values for each alternative that represent the alternative’s effectiveness in meeting the criterion’s intent. Assign the Score on how much “margin” the alternative provides beyond the Threshold value defined for the criterion.
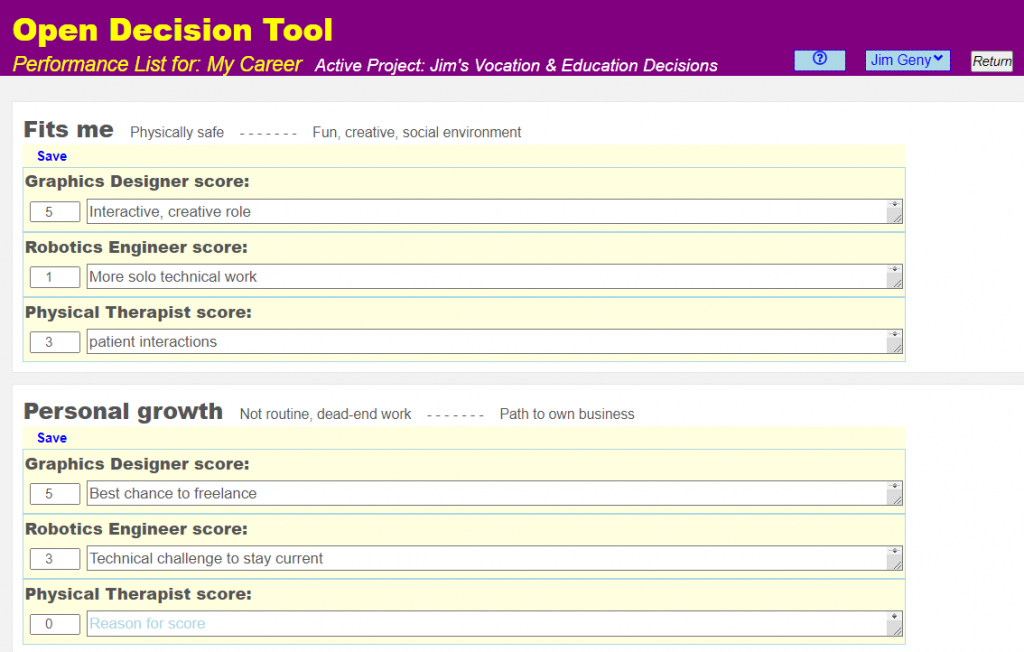
After you have assigned relative scores to all alternatives, check the scores for consistency and click ‘Save” to apply your inputs. Move to the next criterion and repeat this process.
Decision Analysis Panel
From within the Decision Editor, click the Analysis icon (to the immediate right of the Performances button) to view graphical comparisons of the advantages and disadvantages associated with the alternatives. The ODT currently supports two analysis views, the Tornado Chart and the Spider Chart.

Tornado Chart
Click the Tornado Chart option to display the relative merits associated with any pair of “scored” alternatives. Select the two alternatives to display from the drop-down lists in the Tornado Chart header.
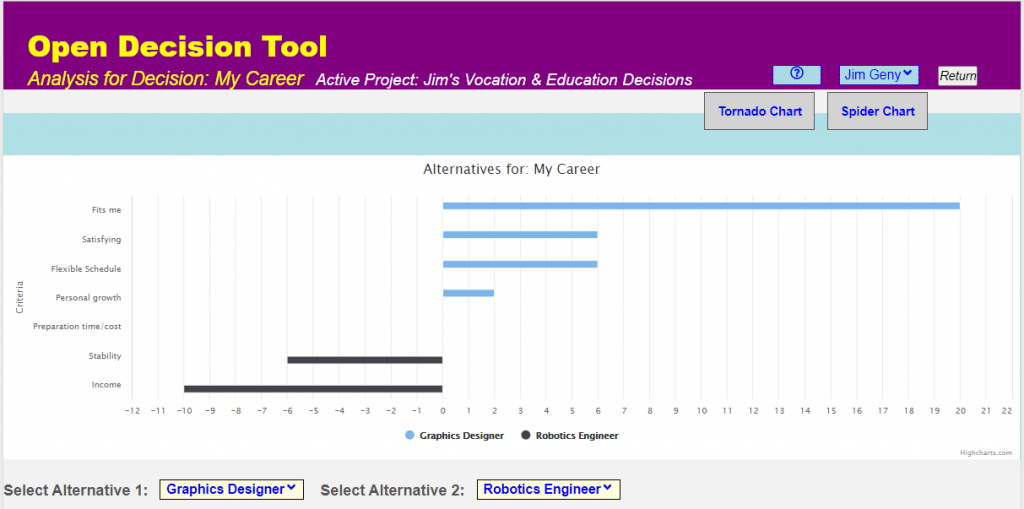
The length of each bar for each criterion is based on the weighted score difference between the two alternative, i.e. it represent that contribution of that criterion to the overall advantage that one alternative has over another. As such the Tornado Chart can help you visualize the tradeoffs that you (giving up on marginal performance of some criteria in order to gain increased performance against other criteria).
Spider Chart
Click the Spider Chart option to view a graphical comparison of the advantages and disadvantages associated with any set of “scored” alternatives. You may click on the alternatives in the Legend to add or remove them from the display.
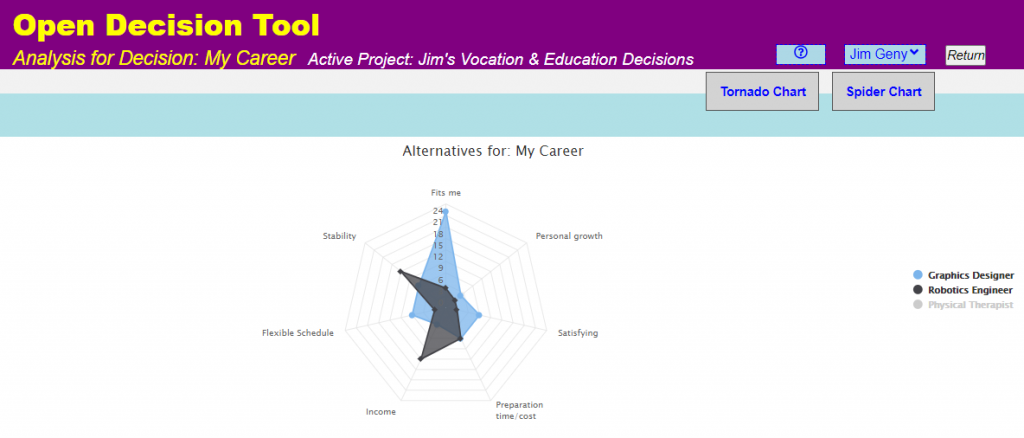
Make sure that the Preference Rationale attribute associated with each alternative “tells a story” that is consistent with the Tornado and Spider Charts.
Sharing Your Project
To share one of your projects with a select subset of ODT subscribers, use the Project Members option at the bottom of the Project Editor. You will already be shown as the Owner. Enter the email address of another known ODT subscriber and click ‘Add Member’ to share your project with them.
In the case of life decisions, consider adding your spouse (e.g. Sue Geny) or other family members who are stakeholders in your life).
If there is no ODT subscriber with the email address that was entered, you will receive an error message:

Either contact this user to encourage them to sign up for ODT access or to confirm their ODT email address.
After a user is added to your project access list, you may set the level of access that they receive to one of the following values:
| Administrator | Full power to add/delete other users, set access rights or add, delete or modify content |
| Contributor | Able to add, delete or modify content |
| Reviewer | Able to post comments against any content |
| Reader | Able to view all content in the project |
NOTE: The current release of ODT has not fully implemented this access rights scheme. If you share a project with another user, they will have Contributor rights, i.e. be able to add to, modify or delete your decisions!